Prioritize tasks when everything is a priority
Organizing your time is a bit like organizing your papers in your house. You decide what you want to do. You set up your list of priorities and you start tackling them one at a time. If you set your priorities low or leave a lot on your list, you may never get the time to get to everything. If you set the priorities too high or work so much that you lose track of time, you may just run out of time before you get to everything you want to do.
I use to just keep a to-do list and check things off as I went through my day. However, at the end of my day, I always had things leftover. Fine, I’ll just carry them over to the next day, and so the routine went. By the time I was at the end of the week I was in a mad rush to cram it all in. Surprisingly, I could usually finish it all. But I had to ask myself, if I could finish my list by the end of the week why couldn’t I complete it the other days of the week?
Parkinson’s Law points out that people usually take all the time allotted (and frequently more) to accomplish any task.
Parkinson’s law
A great way to combat that is by time boxing your tasks, where you set a certain amount of time on any task and focus only on that task for that time. For example, I’ll set a timer for 30 minutes to read. Once that’s finished I put the book down. Next, I’ll set a timer for 20 minutes to answer emails. With that compressed amount of time I won’t worry about them being perfect or zoning out to look at Instagram, I’ll just get them done.
This worked for a while but I kept wasting time trying to figure out what I should do first. Often times there would be several high-priority items that I would spend an hour just debating which would be the best to do first. I needed a way to prioritize my tasks.
Using a prioritization map helped organize my list from most to least important but it didn’t really deal with the “if everything is a priority then nothing is” problem. I still had the problem of prioritizing my task list because I struggled with how much time each task would take. This affected what I should do first of my top priorities.
If everything is a priority then nothing is.
At this point, I’m using three methods to help me better organize my tasks; A to-do list, a prioritization map, and time boxing. However, my high-priority tasks kept me seconding guessing myself and slowing me down. I needed a way to see what was the true top priority of my must-do tasks once and for all.
To do this I created a Time vs. Priority map. It takes your prioritized tasks and further breaks them down into the estimated time you think they will take to complete. Doing this was the final filter through which I was able to see which priorities needed to be done first and in the correct order.
I combined these four methods to help me organize my daily tasks.
Here is a full breakdown of how I organized my tasks.
A quick note. I built the steps on a Miro board to better illustrate each method. It’s also nice to have a digital reference as a template to start from. But most of the time I just sketch out the steps on paper next to my task list. It’s so much faster and easier to add in extra notes as things come to mind throughout the day.

Step one: The Task List
The first thing to do is to get everything out of your head. Make a list on paper, don’t try to organize it. Just write out your tasks as they come out of your head. Everything, meetings, tasks, chores, routines, things that you wish you could do but never find the time for. Just get it all out.
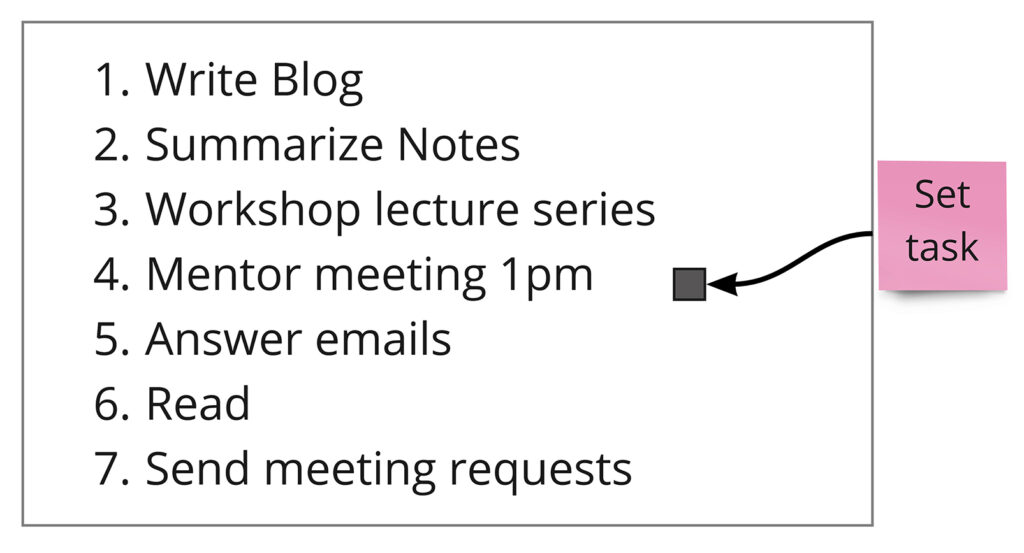
Once your brain dump is complete (hopefully in a list of some sort). Find all of your meetings or anything that has a set appointment time and draw a small box next to that task. These tasks are “set tasks”, they have a place and time where they are set in your task list. The rest of your tasks lack this and steps 2 and 3 will make them set tasks by giving them a time and place. Next, number all your tasks one through however many you have.
Step Two: The Priority Map
A priority map lest you weigh your task four different ways. Place each task, except for the “set tasks” on the priority map based on the four statements.
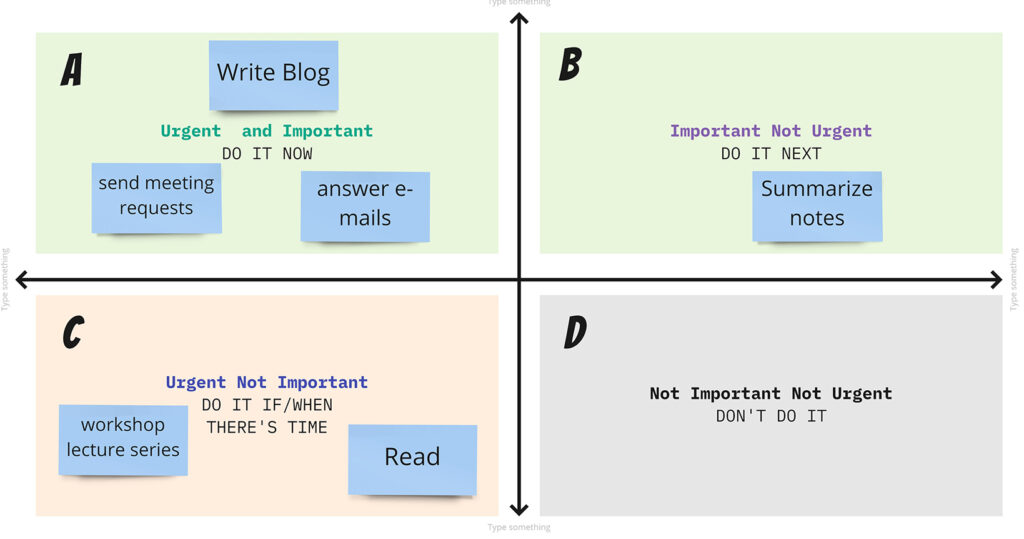
- Is your task Important and Urgent?
- Is your task Important but not urgent?
- Is your task urgent but not important?
- Is your task not urgent and not important?
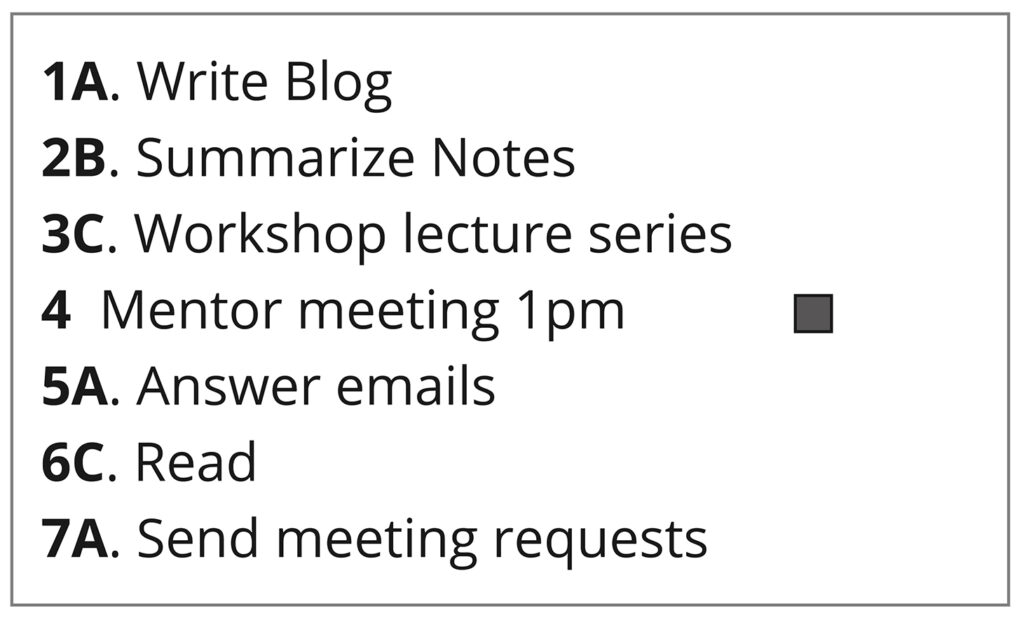
Now go back to your list and assign A-D to each task for the quadrant each task was placed.
Step Three: Priority vs Time Map
At this point, each task will have a number and a letter representing its priority. Eg 2A, 3A, and 1B.
Place the number-letter combo representing your task on the map first based on its priority letter. For example, A goes in the A row. Then move it to the right based on how long you think the task will take. I have time rated as “low”, “medium’, and “high” but you can put a value on it if you like. For instance:
Low = 5min – 1hr
Medium = +1hr – 2hr
High = +2hr – 3hr
If a task takes more than three hours I usually break it up into two different tasks so I can take a break or move it to another day. These rules are not set so change them to fit your work style.
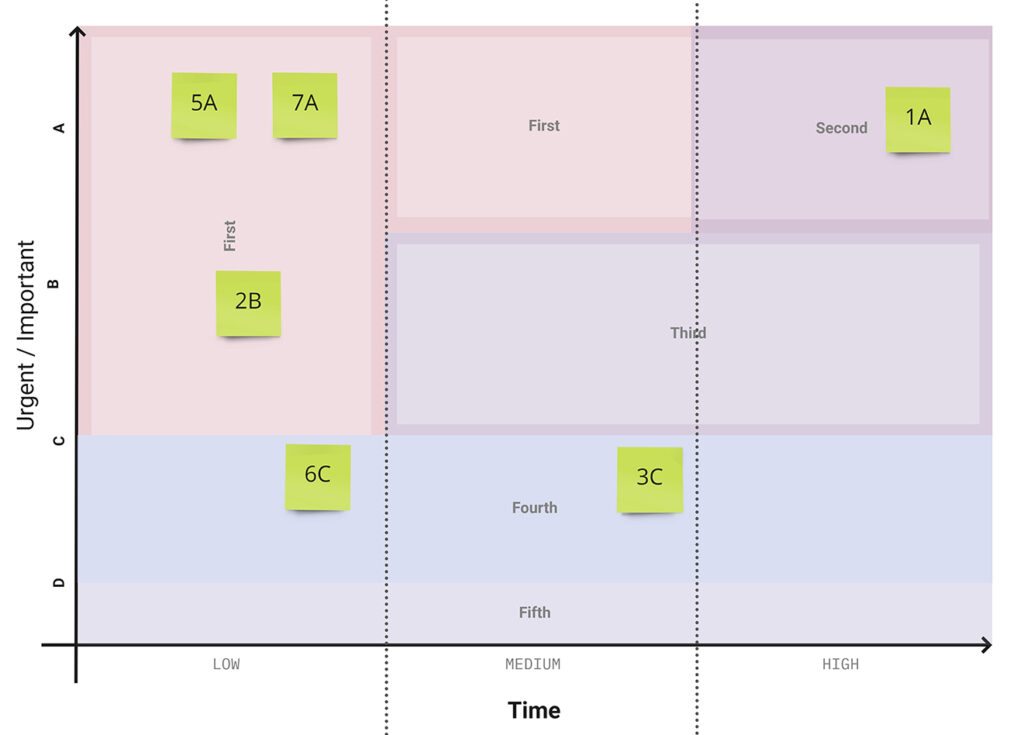
In this map, you will see priority zones. Except for the “first zone” the rest are straightforward based on priority and time. The reason the first zone dips into the ‘B’ row is that I discovered it’s sometimes better to do the quick B task first before an A task that takes longer. So anything that is ‘A/B Low’ automatically goes to the top of your list.
Since each priority has its own lane you can use it to gauge the estimated time each task will take with a lot more detail because you can compare each task visually.
Step Four: Time Boxing Your Day
Now that you know the priority and how much time your tasks will take its time to time-box your day.
Start at the top left of your priority-time map and list all the A and B low time tasks and add the estimated time beside them. Then continue to the A priority medium and high tasks then continue through each priority lane until the list is complete. Then, go back to your initial list and pull down the tasks you put a square beside, your “set-tasks” and place them in the list with the time they will take.
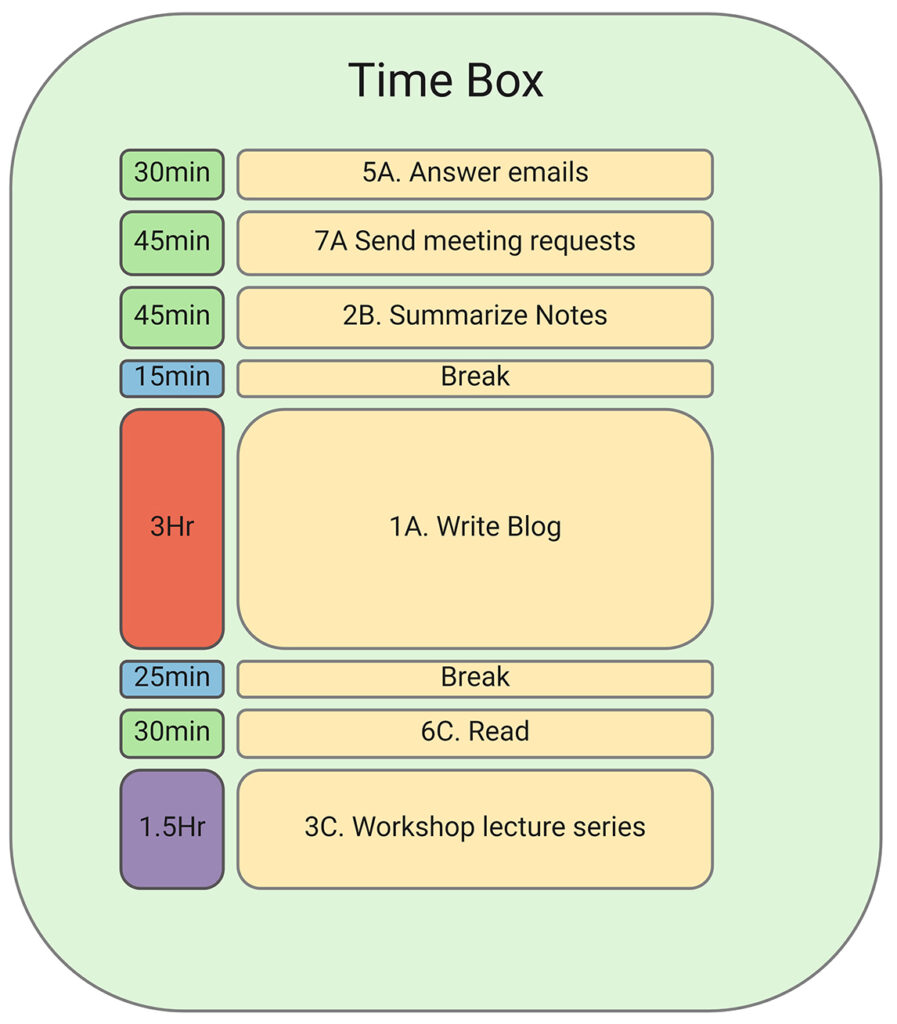
Now you can take a look at your day and the time each task will take. This is also great for visualizing if you’ve taken on too many tasks for one day. In your head it may seem possible but made visual you may realize that it’s not realistic.
Initially, this may seem like a lot just to make out your daily list. I’ve found that if you try out the long version three or four times you will be able to create shortcuts that don’t sacrifice the effectiveness of these four steps.
For example, you can make your initial list and label the priority, and number them without the priority map. Another example, I still always draw out the priority-time map but leave out the first second third sections because I now know where they are. What’s most important is being able to visualize your estimated time the task will take compared to the other tasks.
Making this a habit will also help you establish and discover healthy routines that will become integrated into your timeboxed daily task list.

